Before you read on, you might want to download this entire revision notes in PDF format to print it out for your child, or yourself to read it later.
This will be delivered to your email inbox.
Experiments are a demonstration of scientific concepts, and laboratories are places where such magic happens. Going into a laboratory session may seem like a wonderful adventure, but the report that comes afterwards might feel daunting. Unfortunately, laboratory sessions are few and far in between in the O and A level syllabus, and they’re often not very well integrated with theories that we learn in class.
This disconnect can make it hard to link hands-on experiences with textbook knowledge. On top of that, laboratory and experimental skills are developed with practice and repetition, something that students often do not have enough time to cultivate. This article hopes to provide a crash course about the laboratory, and help you feel more confident and prepared for your next lab session.
Growing up, we’re used to seeing in cartoons how mad scientists cause explosions with a drop of “Chemical X”. While most lab shenanigans do not end this dramatically, lab accidents do happen and can have serious consequences. Many laboratory materials, especially volatile liquids and gases, are chemical irritants that can cause harm upon contact with skin or when inhaled. Understanding the risks associated with laboratory work is key to staying safe, and allowing yourself to conduct experiments responsibly.
For labs that work with biological samples, measures must be in place to protect researchers from pathogens. A biosafety level (BSL) is a set of biocontainment precautions required to isolate biological agents in an enclosed laboratory facility. The levels of containment range from BSL-1 (the lowest) to BSL-4 (the highest).
Most likely, your secondary school or JC’s lab is classified as a BSL-1, where precautions simply consist of thorough hand-washing and minimal protective gear. The experiments that you will be handling have been thoroughly vetted by your instructors and should pose minimal threat to you, hence a BSL-1 facility is more than sufficient to ensure your safety.
Even if the risks are minimal, you are still required to maintain your safety during your lab session! As mentioned earlier, many materials used in your practical sessions (such as acids and reagents) are irritants which can cause harm at high concentrations or over repeated exposures. Hence, do take care to reduce contact with such materials.
Such considerations would have an impact on your experimental design, as you’d be trying to find the most efficient way to handle your experimental materials, while reducing risk to yourself. For example, when handling a certain volume of reagent, you’d take note to use a glass vessel that is large enough, so that you would not risk spilling any of the reagent on yourself. If mixing is required, you may opt for a conical flask that allows gentle swirling, rather than shaking it up bartender-style. Keeping your safety in mind is part of a successful experimental design, to maintain control over your experiment and to avoid accidents.
If you get caught in a spill, what would you do? Firstly, get the offending reagents off you as soon as possible! Wash your arms if the spill is contained within the area, and if you get anything in your eyes, to the eye-wash you go! If you’re absolutely drenched by the spill, you’d have to take an emergency shower at the safety shower. Every lab would have eye-wash and safety showers painted in garishly bright colours, so it’d be impossible to miss. Of course, have someone notify the instructor in charge.
Labs have plenty of fascinating and high-tech-looking equipment, but figuring out how to use them can feel overwhelming at first. Every piece of lab equipment, no matter how simple, is designed with a specific purpose to support your experiment! In this section, we will explore some common equipment, what they are used for and how to handle them effectively.
Laboratory glassware come in a variety of shapes and sizes, and are designed for specific functions such as holding, measuring, heating, mixing or dispensing liquids. In this section, we will explore some commonly used glassware and their purposes, so you can make informed choices when selecting the right tools for your experiments.
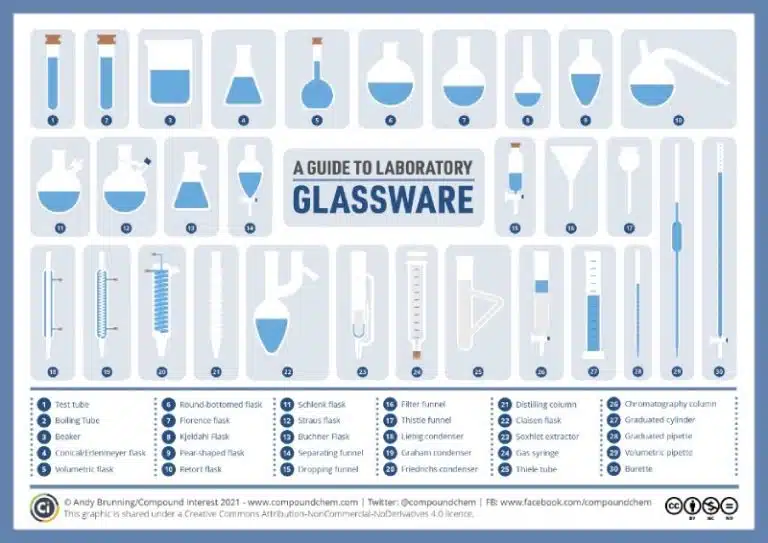
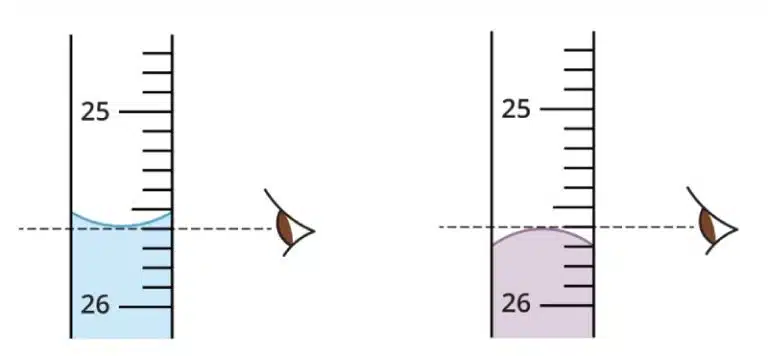
Glassware such as measuring cylinders, burettes and pipettes are designed specifically for measuring liquids. These tools have graduated markings that help you determine volume. To obtain the correct reading, you’d have to take the measurement at the bottom or top of the meniscus.
All tools have an inherent degree of imprecision, usually due to limitations in manufacturing, calibration accuracy and potential for human error. The uncertainty of a particular tool is usually printed on the glassware, but a good rule of thumb is to avoid “guess-timating” beyond half the smallest marked increment. For example, if a measuring cylinder has 2mL intervals, it is at most accurate for measuring up to 1mL , and cannot measure 0.5mL accurately. Hence, you should always choose your measuring vessel based on the volume you need and level of precision required!
Some types of glassware, such as conical flasks and round-bottom flasks, are specifically designed for safely mixing reagents. These flasks have a wide base and narrow neck, allowing you to swirl contents securely while holding the neck. They are ideal for mixing, heating and storing solutions, making them particularly useful for experiments that require agitation or controlled heating. As will filling any container, overfilling increases the risk of spillage even with the slightest movement. Hence, one should take note to select a flask large enough to allow safe mixing without overflowing.
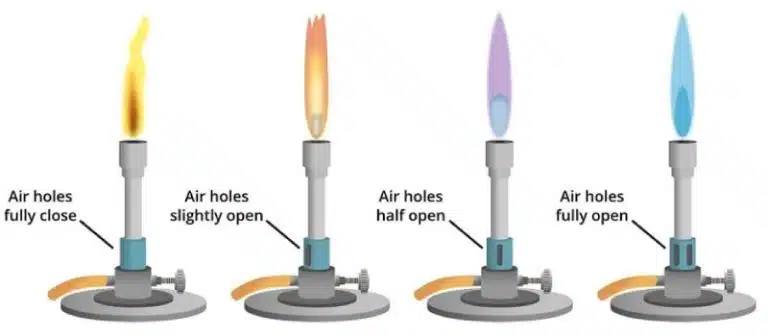
Some experiments require heating or maintaining your reagents at a certain temperature. A bunsen burner is a common gas burner found in laboratories, and is used for heating, sterilization and combustion. After connecting the bunsen burner to a gas line and turning on the gas, you can ignite the burner using a lighter.
Bunsen burners have air holes at their base, and the extent to which these air holes remain open control the colour, intensity and temperature of the flame produced. More open air holes allow more oxygen in, producing a hot blue flame. Partially or fully closed air holes limit oxygen, resulting in a cooler, orange flame. For safety purposes, it is recommended to keep the air hole half-open or less when not actively heating, so that the flame remains visible and easier to control.
A water bath is a piece of equipment consisting of a container filled with heated water, and is used to maintain samples at a constant, controlled temperature. It is useful when a sample needs to be incubated over a period of time without direct heat exposure. A common application is during the heat shock protocol of bacterial transformation, where a water bath of precisely 42℃ is used. Using a water bath ensures uniform heating, which is critical for temperature sensitive protocols.
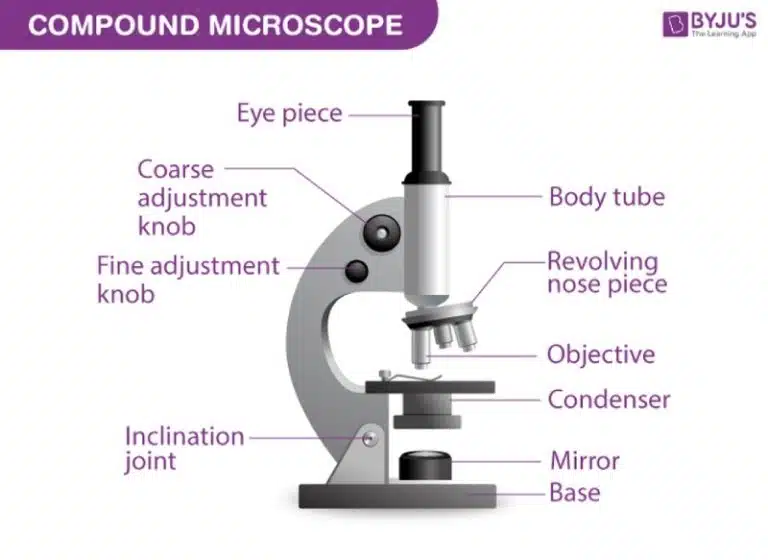
A microscope is used to view objects that are too small to be seen with the naked eye. Microscopes are important to biologists, as they allow for detailed observation of microscopic structures.
A microscope has many moving parts, but its operation is simple. The goal is to obtain a magnified, clear and focused view of your sample. The total magnification is calculated by multiplying the magnification of the eyepiece lens (usually 10X) by that of the objective lens (4X, 10X, 40X, etc.)
Here are the key steps to perfectly focusing your sample!
It is to note that there are two types of objective lenses, air lenses and oil immersion lenses. Most lenses (such as 4X, 10X and 40X) are air lenses, while the 100X objective lens is typically an oil immersion lens. This lens requires a drop of immersion oil between the lens and slide to function properly and produce a clear image.
Usage of the oil immersion lens is not required in the A-level syllabus, so you will not be expected to use it during your practicals. However, try not to let curiosity get the better of you and avoid using the 100X oil immersion lens unless you have been trained to do so, as improper usage can damage the lens.
One tricky part of your A-Level syllabus would be experimental planning. As mentioned earlier, experimental skills are developed through constant practice, yet the syllabus offers limited opportunities to gain hands-on experience. This makes it (understandably) intimidating when you’re asked to design an experiment you’ve never seen before!
However, remember that experiments are simply theories put in action. In this section, we’ll walk through how to break down a planning question and build an experimental proposal.
For this article, let us use a sample question from the OCR A-Level 2020 paper.
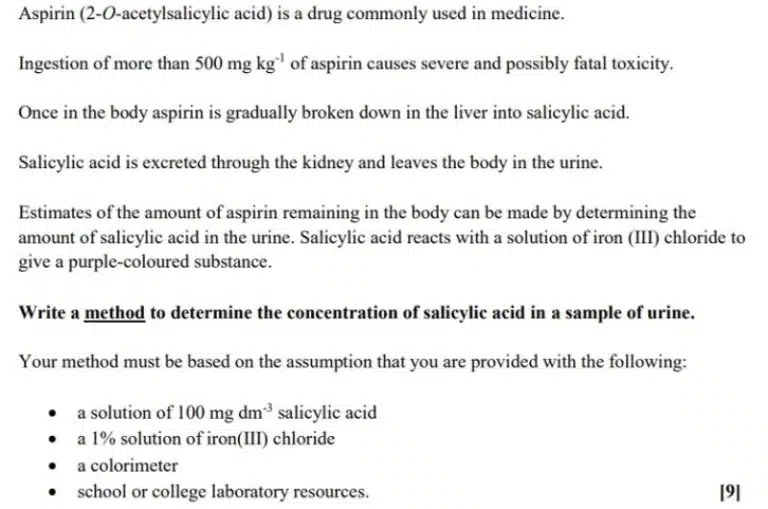
The objective of this question is rather clear, to write a protocol for measuring the concentration of salicylic acid using the materials available. Remember that the output of the dependent variable depends on the independent variable. In this case, the independent variable would be the concentration of salicylic acid, while the dependent variable would be the amount of purple-coloured substance produced through the reaction between salicylic acid and iron (III) chloride.
Hence, our hypothesis is as such: The higher the concentration of salicylic acid, the higher the rate of reaction with iron (III) chloride, and the more purple substance will be produced. The amount of purple substance can be measured with a colorimeter, and so the intensity of the reading from the colorimeter is directly proportional to salicylic acid concentrations.
According to the question, we have been provided with a 100mg/L stock solution of salicylic acid. By diluting this stock solution, we can prepare known concentrations of salicylic acid.
Also according to the question, we can produce a purple substance by reacting salicylic acid with iron (III) chloride. This purple substance can then be quantified with a colorimeter. Hence, we will generate this purple substance by adding a uniform amount of 1% iron (III) chloride to each concentration of salicylic acid produced.
Every experiment needs a positive and negative control to ensure that the experiment is working as intended. We can use plain water which was used to dilute the stock salicylic acid as a negative control, as there should not be any reaction with iron (III) chloride and hence no purple substance produced. The positive control would be the 100mg/L stock of salicylic acid, as it would definitely produce purple substance with iron (III) chloride.
It is important to show that your experimental results are consistent, reliable and reproducible. It is common practice in scientific research to run all experiments in triplicates, meaning the same experiment is conducted thrice under the same parameters.
Now that we have gone through the steps of experimental planning, it is time to throw all your thoughts together into a proposal! If your question has provided you with specific volumes and concentrations, do remember to reference them in your answer! Tables are your best friend when trying to quickly convey numbers to your examiners.
1. Prepare a series of 5mL salicylic acid solutions of varying concentrations.
Concentration of salicylic acid (mg/L) | Volume of 100mg/L salicylic acid stock (mL) | Volume of water (mL) |
100 (positive control) | 5 | 0 |
80 | 4 | 1 |
60 | 3 | 2 |
40 | 2 | 3 |
20 | 1 | 4 |
0 (negative control) | 0 | 5 |
2. To each solution prepared, add 1mL of 1% iron (III) chloride solution, generating a total volume of 6mL of reaction mixture.
3. To ensure reliability and replicability of results, measuring the amount of purple substance will be performed in triplicates. Hence, 2mL of reaction mixture will be measured for each replicate using a colorimeter.
4. Ensuring that there are no outliers amongst each group of triplicates, the readings for the triplicates are averaged, and a graph of salicylic acid concentration can be plotted against colorimeter reading. This generates a standard curve which will serve as a reference for quantifying the concentration of salicylic acid from urine samples.
Even the simplest of experiments have had a lot of the experimenter’s thoughts put into it. In this article, we have talked about the basic equipment that you would encounter in a lab, and the skills required to plan an experiment. While the examples given in this article may be on the simpler side, remember that the devil is in the details, and try to extract as much information as you can out of the planning question, and include these little details in your considerations as you propose an experiment to answer the question.
Find out more by joining us at Science of Studying!
Prepared by: Michelle
You might want to download a pdf copy of this article for future reference!
Click the white download button below, enter your email, and the pdf file will be delivered to your inbox! (Remember to check spam!)
The Science of Studying provides live online tuition via Zoom classes for Combined/Pure Chemistry, Biology, and Physics. To date, we have taught 800+ students over 12 years.
In case you are wondering, yes – there is a science behind studying!
At Science of Studying, we use our SOS system™ to teach our classes so that even last-minute students can see remarkable improvements in their grades – without mind-numbing memorisation of textbooks and without the drudgery of doing numerous assessment books.
All these conducted in a fun, interactive, stress-free online environment.
If you need help with your Chemistry, Biology, and Physics subjects, do reach out to us and we will see what we can do to help.
Contact Us: Click Here
Admin number: +65 88082348

The SOS system™️ guides students through an effective process of:
Join our proven online tuition programs and see real improvements in understanding, confidence, and school results.
Book a free trial lesson and start the journey today or discover more below:
WhatsApp us