Before you read on, you might want to download this entire revision notes in PDF format to print it out for your child, or yourself to read it later.
This will be delivered to your email inbox.
Students at the O-level often pour hundreds of hours into mastering their Paper 1 and 2, but somehow always neglect their practical paper. Often students claim exasperatedly that there is no way to study for it, because they lack a functioning laboratory at home.
Wrong!
Your practical exam (paper 3) is often the difference between an A1 or A2 at the O Level examinations, and whilst knowing the theory of the exam may seem sufficient, it is not comprehensive enough to score full points.
To be specific, the technique of answering, as well as the specific keywords/vocabulary to use is arguably more important than the specific data points and theory tested.
With that, lets delve into it!
Let’s face it……
Chemistry is unpredictable at the exams, especially when it comes to experimental chemistry.
There are countless experiments, reagents and methods the examiners can draw up in your paper. Therefore, it is more crucial we focus and master our fundamentals and basics and thereafter apply them to the context.
Here are some Fundamentals you absolutely need to master, in other to easily obtain A1!
Choosing the right apparatus is the most important first step you need in experiments. More often or not, you will be given a wide range of apparatus (to measure volume), and it is vital you know how to choose which apparatus to use.
There are countless amounts of apparatus available to you in the chemistry lab, and this guide will only cover the 4 main tools used to measure volume.
Please read up on the rest once you master the 4 below!
Apparatus | Accuracy | Use |
Beaker/Conical Flask | Very Low | Only for mixing or holding approximate volumes. Questions usually will state “approximate” to use this. Otherwise, usually used for when reagents are in excess and the specific volume isn’t necessary. |
Measuring Cylinder | Medium (to 0.5) | Often for preparative work where extreme precision is not required (added in excess etc) |
Burette | High (to 0.05) | Usually for titrations, or delivering variable volumes of liquids. |
Pipette | Very High (fixed volume) | Transferring a specific, fixed amount of liquid. Usually for titrations as well. |
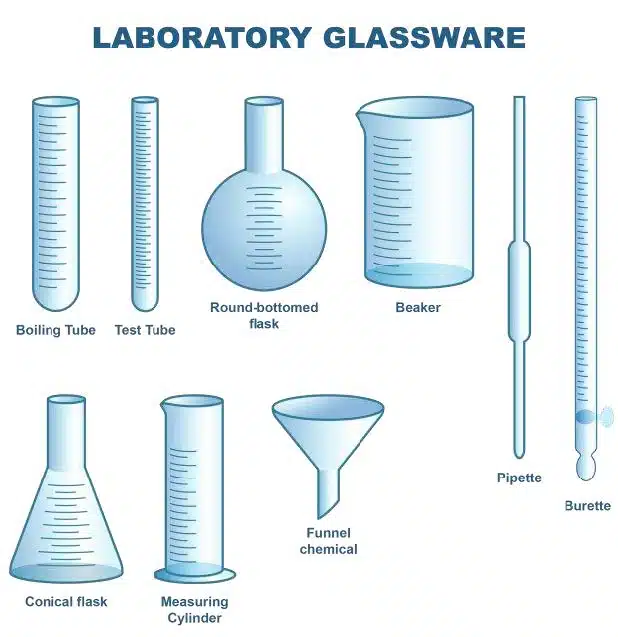
Some examples of glassware commonly given in the laboratory. It is always useful to know your apparatus well!
How many significant figures should you record your data to? How many decimal places? Students frequently panic whenever recording down their data, eventually losing marks to the precision of measurement units.
All these are basics that should be at your fingertips. Here’s a quick refresher if you have forgotten…
Apparatus | Recording Precision | Example |
Burette | 2 decimal places (ending in 0 or 5) | 23.40 |
Pipette | 1 decimal place | 25.0 |
Measuring Cylinder | Nearest half-division (usually 0 or 0.5) | 10.5 |
Thermometer | 1 decimal place (usually 0.0 or 0.5) | 37.6 |
Stopwatch | Nearest second (for manual timing) | 30s |
Tip!
You will usually use the data you obtained from the experiments to do calculations.
The general rule of thumb is that the precision of your calculated data cannot be MORE than your measured, ie. If your volume is 23.40 measured, your calculated cannot be more than 2 decimal places!
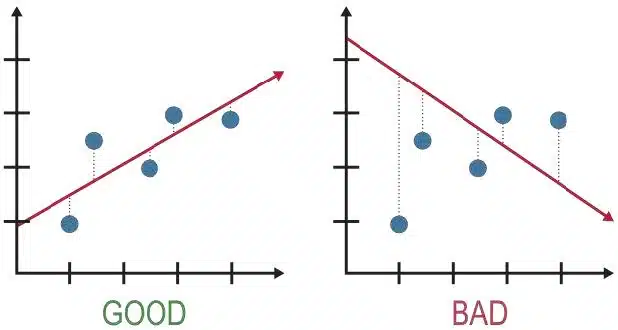
Once you completed your experiments, you will usually be asked to process the data and answer questions based on your experiment. This section focuses on how to process your data in the correct manner, which is usually in the form of a graph.
It is extremely easy to lose marks in graphing.
Here are the most common points where students miss out in the exam:
Your data points must occupy at least 50% of the grid paper in both directions.
Label with Quantity AND Unit (e.g., “Time / s”).
Remember to give your graph an appropriate title (Usually: Graph of (y-axis)
against (x-axis))
Use small ‘x’ crosses, not dots or circles.
Do not force the line through the origin (0,0) unless it makes scientific sense (e.g.,
at time=0, volume=0). For example, if you start with 100cm3 of a gas, there is no
sense in plotting ([0,0]).
Draw a smooth curve or a straight ruler line.
Never “connect the dots” zig- zag style.
If a point is far off the trend line:
Circle it.
Do not include it in your line of best fit.
Explain it: Usually caused by a specific error, there will be a question to ask this.
If not, remember to include it in your explanation
Here, a collection of the most common mistakes is compiled from the two most important experiments in the O Level examination: Titration and Qualitative Analysis (QA)
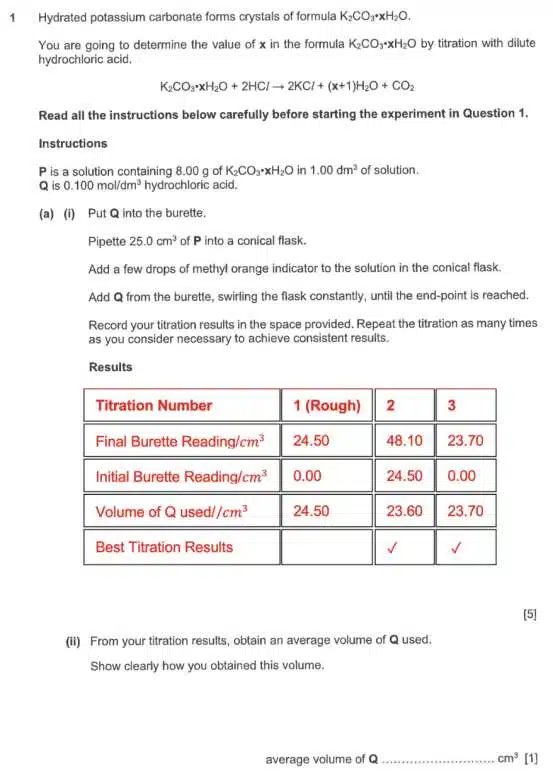
In a titration reaction, remember that the endpoint is the drop which changes the colour of the reaction. Some reactions do not need an indicator, whereas some do.
Remember to remove the filter funnel from the burette once you fill up your burette. Leaving it on risks inaccurate burette reading.
For titration,
the volume used = final volume – initial volume.
Technique wise, always add the chemical in the burette in drop wise manner. This is to avoid the mistake of exceeding the endpoint, as you risk inaccurate results, and having to redo the experiment, which will slow you down even more.

Key point: Describe what you see, not what you think it is. Students to always use standard answering phrasing.
When precipitates are observed, never write “it went cloudy.”
Write: “A white precipitate formed.”
When describing the solubility of precipitates, always include details like: “Insoluble in excess” or “Dissolves in excess to form a colourless solution.”
When identifying gases: Don’t just name the gas. Describe the full test with the results.
Bad Answers: “Hydrogen gas evolved.”
Good Answers: “Effervescence observed. Gas extinguished a lighted splint with a ‘pop’ sound, thus effervescence produced is hydrogen gas.”
Planning is usually the third component and is often the most “studiable” component of the whole practical exam.
It is important to know how to write the planning steps in the correct scientific manner.
If unsure, follow the POD framework if unsure:
Procedure, Observation and Data Processing.
Write in imperative, numbered steps, in a step-by-step manner.
Be specific with quantities, and clear with instructions.
Vague: “Add acid to the solid.”
Precise: “Measure 20ml of HCl using a measuring cylinder and pour it into a beaker containing 2g of Magnesium solid.
Explicitly state what you will measure and with what tool.
For example,
“Record the initial temperature of the solution using a thermometer.”
“Record the time taken for the cross to disappear using a stopwatch.”
Explain how the data answers the aim, and which processing method you need to use.
“Calculate the change in temperature.”
“Plot a graph of Volume of Gas (-axis) vs. Time (-axis).”
Avoid using conversational English to answer experimental chemistry questions.
Instead, use scientific keywords to explain an observation or a step.
Here is a list of words to avoid using and the alternative to adopt instead…
“Forbidden Word” | Why it fails | The Winning Alternative |
“Amount” | Vague. Could mean mass, moles, or volume. | Use “Mass” (for solids) or “Volume” (for liquids/gases). |
“Clear” | Describes transparency, not color. | Use “Colourless” (for water-like liquids). |
“Disappears” | Matter does not vanish. | Use “Dissolves” or “Reacts completely.” |
“Put” | Too casual. | Use “Add,” “Transfer,” or “Pour.” |
“Same” | Ambiguous. | Use “Constant” (for variables). |
Avoid using human error as a source of error.
It is often vague, ambiguous and displays a lack of understanding of the experiment at hand.
Instead, here are some template answers to use instead. Also, avoid stating the error without providing a solution.
Temperature Experiments:
Avoid “Heat loss to the surroundings.”
Instead: “Insulate the beaker with polystyrene” or “Use a lid.”
Chromatography:
Avoid “Solvent line above the start line.”
Instead: “Samples wash off into the solvent rather than separating.”
Crystallization:
Avoid “Crystals lost during filtration.”
Instead: “Wash the residue with cold distilled water.”
When asked to draw apparatus, you are drawing a scientific diagram, not art.
Therefore, do not draw it as if you are in art class.
Here are some guidelines for you to follow…
In this article, we have covered the foundations and techniques to deal with Experimental Chemistry questions. Now, it is time for you to practice these skills and try out the following sample questions!
Find out more by joining us at Science of Studying!
Prepared by: Lys
Download the Notes below for Full Answer Key.
You might want to download a pdf copy of this article for future reference!
Click the white download button below, enter your email, and the pdf file will be delivered to your inbox! (Remember to check spam!)
The Science of Studying provides live online tuition via Zoom classes for Combined/Pure Chemistry, Biology, and Physics. To date, we have taught 800+ students over 12 years.
In case you are wondering, yes – there is a science behind studying!
At Science of Studying, we use our SOS system™ to teach our classes so that even last-minute students can see remarkable improvements in their grades – without mind-numbing memorisation of textbooks and without the drudgery of doing numerous assessment books.
All these conducted in a fun, interactive, stress-free online environment.
If you need help with your Chemistry, Biology, and Physics subjects, do reach out to us and we will see what we can do to help.
Contact Us: Click Here
Admin number: +65 88082348

The SOS system™️ guides students through an effective process of:
Join our proven online tuition programs and see real improvements in understanding, confidence, and school results.
Book a free trial lesson and start the journey today or discover more below:
WhatsApp us